
Recipe Snapshot
Recipe at a Glance
Key timing, yield and style details before you start cooking.
Dough Hydration and Fat Integration Control
Melon pan dough relies on a balanced hydration ratio to achieve a soft, elastic crumb without excessive stickiness. The inclusion of butter and milk introduces both fat and lactose, which tenderise the gluten network and promote even browning. Sugar not only sweetens but also moderates yeast activity, preventing overproofing. The dough’s protein structure must be sufficiently developed to support the cookie crust without collapsing during baking. Proper sequencing—mixing dry ingredients before incorporating wet—ensures even hydration and consistent gluten formation. Salt is introduced after initial mixing to tighten the gluten and balance sweetness, maintaining structural integrity through fermentation and baking.
Temperature and Fermentation Management
Precise temperature staging is critical for yeast control and dough elasticity. Bulk fermentation at moderate warmth (around 27°C) allows steady gas development without overexpansion. Excessive heat accelerates fermentation, weakening the dough’s ability to hold shape under the cookie crust. During proofing, ambient humidity must be controlled to prevent surface drying, which would hinder crust adhesion. The cookie dough component should remain chilled until assembly to maintain its plasticity and prevent premature spreading. Baking temperature must be high enough to set the crust rapidly while allowing internal crumb expansion, achieving a defined contrast between crisp exterior and soft interior.
Textural Transformation and Layer Interaction
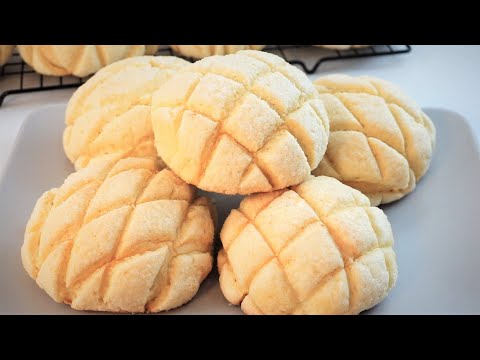
The defining feature of melon pan is the dual texture: a tender, enriched bread base and a thin, crisp cookie shell. During baking, the cookie layer undergoes Maillard browning and sugar caramelisation, forming a delicate crust that fractures cleanly. Simultaneously, the bread dough expands, pushing against the crust to create the characteristic crack pattern. Proper timing ensures the crust sets just as the internal crumb reaches full volume. Overbaking leads to excessive dryness, while underbaking leaves the crust pale and soft. The internal crumb should remain moist and elastic, with a fine, even cell structure supported by balanced gluten development.
Workflow Coordination and Efficiency
Professional execution of melon pan requires parallel management of two doughs with differing temperature sensitivities. The cookie dough can be prepared and chilled in advance, allowing the bread dough to ferment without interruption. Dividing and shaping must be synchronised to prevent overproofing. Rolling the cookie layer evenly ensures uniform thickness and controlled cracking during baking. Using a lightly floured surface prevents sticking without introducing excess flour that could toughen the crust. Efficient sequencing—mix, ferment, chill, shape, proof, bake—minimises idle time and maintains consistent product quality across batches.
Cultural and Technical Lineage
Melon pan originated in Japan during the early 20th century, influenced by European sweet breads and Chinese pineapple buns. Despite its name, traditional versions contain no melon flavour; the name references the crust’s melon-like pattern. The technique reflects Japan’s adaptation of Western baking methods, integrating precise fermentation control with confectionery-style crust application. Modern variations may include melon essence or fillings, but the core structure—enriched dough beneath a cookie crust—remains unchanged. The method exemplifies Japan’s approach to hybrid pastry development, combining bread-making discipline with patisserie precision.
Recipe Education
Learn the Skills Behind This Recipe
Build confidence with cooking skills, techniques, and tools used in this recipe.
Baking Tools Guide
Understand essential tools for mixing, measuring, and preparing recipes.
Recommended for the bake method used in this recipe.
Oven Temperature Conversions
Understand oven temperatures and how they affect baking and roasting.
Recommended for the bake method used in this recipe.
Cups to Grams
Convert cup measurements more accurately to improve recipe consistency.
Helpful when using measuring cups during preparation.
Teaspoons to Grams
Use small-measure conversions more accurately in cooking and baking.
Helpful when using measuring spoons during preparation.


Melon Pan (Sweet Bread Bun)
Description
Melon pan dough relies on a balanced hydration ratio to achieve a soft, elastic crumb without excessive stickiness. The inclusion of butter and milk introduces both fat and lactose, which tenderise the gluten network and promote even browning. Sugar not only sweetens but also moderates yeast activity, preventing overproofing. The dough’s protein structure must be sufficiently developed to support the cookie crust without collapsing during baking. Proper sequencing—mixing dry ingredients before incorporating wet—ensures even hydration and consistent gluten formation. Salt is introduced after initial mixing to tighten the gluten and balance sweetness, maintaining structural integrity through fermentation and baking.
Ingredients
Ingredients
Instructions
Instructions
Step 1
Combine bread flour, sugar, and salt in a Mixing Bowl. Dissolve instant yeast in lukewarm milk and add to the dry ingredients along with the egg. Mix until a rough dough forms.Keep milk below 40°C to avoid yeast damage and ensure even fermentation.Step 2
Add softened butter to the dough and knead on a lightly floured Cutting Board until smooth and elastic, about 10 minutes. Form into a ball and place in a lightly oiled Mixing Bowl.Incorporate butter gradually to prevent dough slippage and ensure full gluten development.Step 3
Cover and ferment the dough at 27°C until doubled in size, approximately 60 minutes. Meanwhile, prepare the cookie crust by creaming butter and sugar (for crust) in a Mixing Bowl until pale, then beat in the egg and fold in cake flour to form a soft dough.Keep the cookie dough cool to maintain plasticity; overmixing will toughen the crust.Step 4
Divide the bread dough into 8 equal portions, shape into balls, and rest for 10 minutes. Roll the cookie dough into 8 discs large enough to cover each bread ball. Wrap each bread ball with a cookie disc and gently press to adhere.Use minimal flour when rolling to avoid preventing crust adhesion to the dough surface.Step 5
Roll each assembled bun in granulated sugar (for topping) and score a crosshatch pattern on the surface using a Paring Knife. Place on a Baking Sheet lined with Parchment Paper and proof for 30 minutes.Score lightly to avoid cutting through the crust; shallow lines encourage controlled cracking.Step 6
Bake in a preheated oven at 180°C for 13–15 minutes until golden brown. Transfer to a Cooling Rack and allow to rest for 10 minutes before serving.Avoid overbaking; residual heat will continue to firm the crust during resting.
Recommended Equipment

Nutrition Facts
Servings 8
Serving Size 1 portion
- Amount Per Serving
- Calories 316.36kcal
- % Daily Value *
- Total Fat 10.48g17%
- Saturated Fat 5.88g30%
- Cholesterol 64.28mg22%
- Sodium 217.8mg10%
- Potassium 90.85mg3%
- Total Carbohydrate 48.24g17%
- Dietary Fiber 1.22g5%
- Sugars 16.39g
- Protein 7.47g15%
- Vitamin A 335.24 IU
- Calcium 34.65 mg
- Iron 0.61 mg
- Vitamin D 0.54 mcg
- Vitamin E 0.53 mg
- Thiamin 0.12 mg
- Riboflavin 0.13 mg
- Niacin 0.72 mg
- Vitamin B6 0.05 mg
- Folate 34.53 mcg
- Vitamin B12 0.2 mcg
- Pantothenic Acid 0.51 mg
- Phosphorus 86.22 mg
- Magnesium 14.67 mg
- Zinc 0.64 mg
- Selenium 21.28 mcg
- Copper 0.09 mg
- Manganese 0.35 mg
* Nutrition information is provided as an estimate per serving and may vary depending on the ingredients, brands, substitutions, portion sizes and preparation methods used. Percent Daily Values (%DV) are based on U.S. FDA reference values for a 2,000-calorie diet and are intended as a general guide only. Individual nutritional needs vary. This information is not a substitute for advice from a registered dietitian or other qualified healthcare professional.
Note
Use sterilised containers and ensure full submersion where applicable to maintain product safety and prevent microbial instability during storage. The resting phase supports structural stabilisation and moisture redistribution. Cutting or serving too early may compromise internal balance. Dairy-based elements may thicken further upon cooling. Reheat gently to prevent separation or grainy texture. In larger batches, maintain even heat distribution and avoid overcrowding during reheating to preserve structural integrity. Acid balance may soften slightly over time; a final adjustment before serving restores clarity.


