
Recipe Snapshot
Recipe at a Glance
Key timing, yield and style details before you start cooking.
Starch Gelation and Moisture Retention Control
Taro root contains a high proportion of complex starches that gelatinise between 70–85°C, requiring controlled hydration to achieve a cohesive yet tender crumb. The ratio of grated taro to rice flour determines the final density; excessive flour yields a dry matrix, while insufficient starch prevents structural set. Coconut milk introduces both fat and water, balancing mouthfeel and moisture retention. Sugar acts as a humectant, slowing retrogradation and maintaining softness after cooling. Salt enhances the natural sweetness and balances the earthy taro flavour. Proper mixing sequence—hydrating dry ingredients before incorporating fat—ensures even starch dispersion and prevents clumping during steaming.
Heat Management and Steaming Precision
Steaming provides uniform heat transfer without direct surface dehydration, critical for taro’s dense starch network. Maintaining consistent steam intensity prevents uneven setting or surface cracking. The batter must be poured into a preheated tray to initiate immediate gelatinisation at the base, avoiding layer separation. Covering the steamer lid with a cloth prevents condensation from dripping onto the surface, which would cause pitting. Timing accuracy is essential; under-steaming leaves a gummy core, while over-steaming leads to excessive water absorption and structural collapse upon cooling. Controlled cooling at ambient temperature allows the starch matrix to stabilise before cutting.
Textural Transformation During Cooking
As the batter steams, rice flour starch granules swell and integrate with taro’s natural amylopectin, forming a cohesive gel. Coconut fat emulsifies within this matrix, producing a smooth, slightly elastic texture. The transition from opaque to translucent signals complete gelatinisation. Upon cooling, the cake firms through retrogradation, allowing clean slicing into squares. The final texture should be resilient yet yielding, with a fine crumb and uniform moisture distribution. Proper resting ensures the internal moisture gradient equalises, preventing surface stickiness or internal sogginess when portioned.
Workflow Efficiency and Component Coordination
Efficient mise en place reduces downtime between mixing and steaming, as the batter thickens if left standing. Grating taro immediately before mixing prevents oxidation and discolouration. Pre-measuring coconut milk and sugar allows rapid integration, minimising air incorporation that could disrupt the dense texture. The steamer should reach full temperature before batter loading to maintain consistent cooking conditions. Cooling on a rack rather than a solid surface prevents condensation buildup underneath the tray, preserving the cake’s base texture. Cutting with a lightly oiled knife ensures clean edges and prevents tearing of the set starch gel.
Regional Technique Lineage and Modern Adaptation
Taro cake squares derive from Southern Chinese and Southeast Asian steamed cake traditions, where root vegetables are integrated into rice-based batters for dim sum and festival offerings. The method evolved from Cantonese yam cake (wu tau gou), substituting taro for yam while retaining the same steaming and slicing technique. Coconut milk inclusion reflects Southeast Asian influence, particularly in Malaysian and Vietnamese adaptations that favour richer, aromatic profiles. Modern versions standardise ratios for consistent texture and shelf stability, aligning traditional starch gelation principles with contemporary precision control.
Recipe Education
Learn the Skills Behind This Recipe
Build confidence with cooking skills, techniques, and tools used in this recipe.
Cooking Basics
Build safer knife preparation, heat control, timing, and everyday kitchen confidence.
Helpful when using chef knife during preparation.
Cookware Guide
Learn which pots and pans work best for frying, sautéing, simmering, and roasting.
Helpful when using saucepan during preparation.
Baking Tools Guide
Understand essential tools for mixing, measuring, and preparing recipes.
Helpful when using mixing bowl during preparation.
Batch Cooking
Cook once and prepare multiple meals more efficiently.
Selected for this type of recipe.


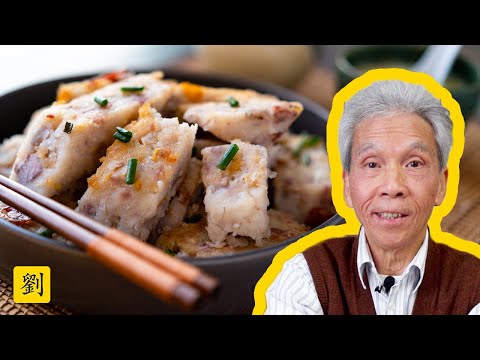
Taro Cake Squares
Description
Taro root contains a high proportion of complex starches that gelatinise between 70–85°C, requiring controlled hydration to achieve a cohesive yet tender crumb. The ratio of grated taro to rice flour determines the final density; excessive flour yields a dry matrix, while insufficient starch prevents structural set. Coconut milk introduces both fat and water, balancing mouthfeel and moisture retention. Sugar acts as a humectant, slowing retrogradation and maintaining softness after cooling. Salt enhances the natural sweetness and balances the earthy taro flavour. Proper mixing sequence—hydrating dry ingredients before incorporating fat—ensures even starch dispersion and prevents clumping during steaming.
Ingredients
Ingredients
Instructions
Instructions
Step 1
Prepare the steamer by bringing water to a steady boil in a Stock Pot fitted with a Steamer Basket. Lightly grease a square Casserole Dish with neutral oil.Ensure the steamer water level is below the basket base to prevent direct contact and uneven steaming.Step 2
In a Mixing Bowl, combine grated taro root, rice flour, caster sugar, and salt. Mix thoroughly using a Silicone Spatula until evenly distributed.Uniform dry mixing prevents flour pockets that can cause dense, uneven sections after steaming.Step 3
Gradually pour in coconut milk while stirring continuously until a smooth, thick batter forms with no visible lumps.Add liquid slowly to allow full starch hydration and prevent separation of solids during steaming.Step 4
Pour the batter into the greased Casserole Dish, smoothing the surface with the Silicone Spatula. Place the dish into the preheated Steamer Basket.Tap the dish lightly on the counter to release trapped air bubbles that could create voids in the final texture.Step 5
Steam over medium heat for 40 minutes, maintaining consistent steam output. Check doneness by inserting a Paring Knife; it should emerge clean.Avoid lifting the lid frequently, as steam loss reduces chamber temperature and prolongs cooking time.Step 6
Remove the dish and cool on a Cooling Rack for 1 hour to allow structural setting. Once firm, cut into 4 cm squares using a Chef Knife.Lightly oil the knife blade before cutting to achieve clean edges without tearing the gelled crumb.
Recommended Equipment

Nutrition Facts
Servings 8
Serving Size 1 portion
- Amount Per Serving
- Calories 276.06kcal
- % Daily Value *
- Total Fat 12.43g20%
- Saturated Fat 9.28g47%
- Sodium 304.39mg13%
- Potassium 521.01mg15%
- Total Carbohydrate 54.12g19%
- Dietary Fiber 3.35g14%
- Sugars 0.3g
- Protein 3.46g7%
- Vitamin C 3.04 mg
- Calcium 40.03 mg
- Iron 2.02 mg
- Vitamin E 1.93 mg
- Vitamin K 1.94 mcg
- Thiamin 0.1 mg
- Riboflavin 0.02 mg
- Niacin 1.33 mg
- Vitamin B6 0.28 mg
- Folate 20.19 mcg
- Pantothenic Acid 0.47 mg
- Phosphorus 126.6 mg
- Magnesium 52.6 mg
- Zinc 0.62 mg
- Selenium 4.28 mcg
- Copper 0.25 mg
- Manganese 0.91 mg
* Nutrition information is provided as an estimate per serving and may vary depending on the ingredients, brands, substitutions, portion sizes and preparation methods used. Percent Daily Values (%DV) are based on U.S. FDA reference values for a 2,000-calorie diet and are intended as a general guide only. Individual nutritional needs vary. This information is not a substitute for advice from a registered dietitian or other qualified healthcare professional.
Note
Store in an airtight container under refrigeration, ensuring minimal air exposure to preserve flavour integrity and textural balance. The resting phase supports structural stabilisation and moisture redistribution. Cutting or serving too early may compromise internal balance. Dairy-based elements may thicken further upon cooling. Reheat gently to prevent separation or grainy texture. In larger batches, maintain even heat distribution and avoid overcrowding during reheating to preserve structural integrity. Slow-cooked preparations often improve after several hours or overnight refrigeration as aromatic compounds integrate more fully. Texture refinement often occurs naturally during resting due to internal moisture redistribution.


